# Vue
# Vue基本原理
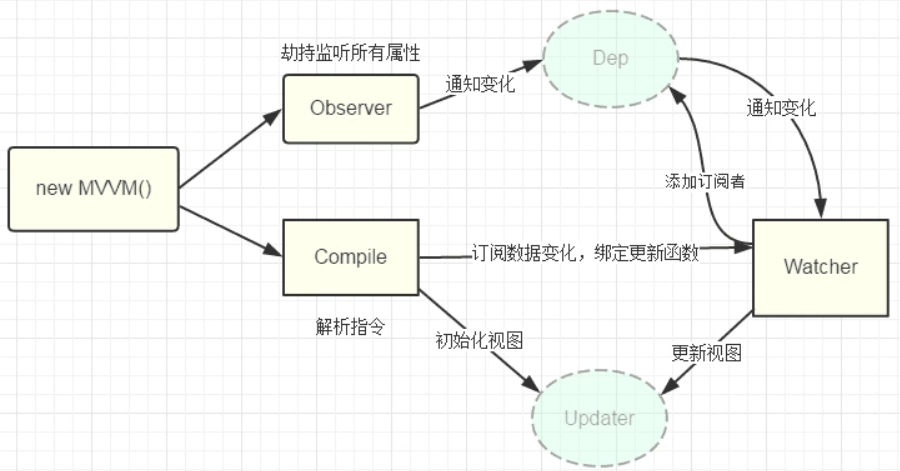
MVVM模型,视图和数据模型由viewmodel层进行双向数据绑定 ,尽可能少的手动操作dom。
- Observer(数据劫持),将一个普通的js对象传入vue实例作为data选项,vue会遍历该对象的所有property,并使用Obeject.defineProperty()为这些property添加getter/setter进行数据劫持。每当数据变化会通知Dep
- Dep(发布者dependence),统一管理订阅者,接收到数据变化后,用来通知所有订阅该数据的Watcher
- Watcher(订阅者),接受属性变化并执行相应的函数update(),并触发Compile中的回调
- Compile(编译),解析虚拟dom树中的vue指令,解析完成后为数据添加Watcher,监听初始化及其变化,最后通过回调函数更改dom数据
<div id="demo">
  <div>{{name}}</div>
  <div>{{address}}</div>
</div>
<script type="text/javascript">
  let person = {
    'sex':'girl',
    'name':'晓甜甜',
    'address':'XXX公寓',
    'parent':{
      'father':'小明',
      'mother':'李红'
    }
  }
  //监听数据对象的所有属性值
  function observe(data){
    if(!data||typeof(data)!=='object'){
      return
    }
    // Object.keys(data) 和 for...in的遍历差不多,该函数返回一个对象包含的所有属性的数组
    Object.keys(data).forEach((key)=>{
      dataHijacking(data,key,data[key]) //用数据劫持改写get和set方法
    })
  }

  function dataHijacking(obj,prop,val){
    observe(val) //递归监听
    let dep = new dependence()
    Object.defineProperty(obj,prop,{
      enumerable: true,
      configurable: true,
      get:function(){
        if(dependence.target){
          dep.addwatcher(dependence.target) //通过触发get回调添加订阅者watcher
        }
        return val
      },
      set:function(newVal){
        if(val === newVal){
          return
        }
        val = newVal
        dep.notify() //数据更新时通过依赖函数通知所有订阅者
      }
    })
  }

  // 依赖,用于联系watcher和observer
  function dependence(){
    this.watchers = [] //用一个数组用于存储watcher
  }
  dependence.prototype = {
    addwatcher:function(watcher){
      this.watchers.push(watcher)
    },
    notify:function(){
      this.watchers.forEach((watcher)=>{
        watcher.update() //通知所有订阅者触发更新函数
      })
    }
  }
  dependence.target = null

  function watcher(vm,key,callback){
    this.callback = callback //执行回调,这里可以动态操作相关dom
    this.vm = vm  //这个参数一般会保留全局的vm,用于访问data
    this.key = key //确定自己是哪个数据的订阅者
    this.value = this.get() //通过调用这个方法将自己添加到依赖数组中去,同时缓存旧值
  }
  watcher.prototype = {
    update:function(){
      let value = this.vm.data[this.key] //一般我们都会操作实例vue上挂载的data
      let oldVal = this.value //初始化时候的旧值
      if(oldVal!==value){
        //如果这两个值不相等,才触发回调,也就是dom操作,这有利于优化性能
        this.value = value
        this.callback.call(this.vm, value, oldVal)
      }
    },
    get:function(){
      dependence.target = this //将自己缓存,准备添加到依赖中去
      let value = this.vm.data[this.key] //这个操作会触发observe的get
      dependence.target = null // 释放自己
      return value
    }
  }

  function compile(el,vue){
    this.vm = vue
    this.compileElement(el)
  }
  compile.prototype = {
    compileElement:function(el){
      var childNodes = el.childNodes;
      var self = this;
      [].slice.call(childNodes).forEach(function(node) {
        var reg = /\{\{(.*)\}\}/;
        var text = node.textContent;
        if (self.isTextNode(node) && reg.test(text)) {  // 判断是否是符合这种形式{{}}的指令
          self.compileText(node, reg.exec(text)[1]);
        }
        if (node.childNodes && node.childNodes.length) {
          self.compileElement(node);  // 继续递归遍历子节点
        }
      });
    },
    compileText:function(node, exp) {
      var self = this;
      var initText = this.vm[exp];
      this.updateText(node, initText);  // 将初始化的数据初始化到视图中
      new watcher(this.vm, exp, function (value) {  // 生成订阅器并绑定更新函数
        self.updateText(node, value);
      });
    },
    updateText:function (node, value) {
      node.textContent = typeof value == 'undefined' ? '' : value;
    },
    isTextNode: function (node) {
      return node.nodeType === 3
    }
  }


  function mvvm(data,el){
    let self = this
    this.data = data
    observe(data)
    Object.keys(data).forEach(function(key) {
        self.proxyKeys(key)  // 绑定代理属性
    })
    new compile(el,this)
    return this //返回实例,主要是为了可供全局查看当前实例
  }

  mvvm.prototype = {
    proxyKeys:function(key){
      let self = this
      Object.defineProperty(this,key,{
        enumerable: false,
        configurable: true,
        get: function proxyGetter() {
            return self.data[key]
        },
        set: function proxySetter(newVal) {
            self.data[key] = newVal
        }
      })
    }
  }

  let el = document.getElementById('demo')
  let vm = new mvvm(person,el)
  setTimeout(function(){
    vm.name = '饭甜甜'
  },2000)
</script>
# 双向数据绑定原理
Vue.js 是采用数据劫持结合发布者-订阅者模式的方式,通过Object.defineProperty()来劫持各个属性的setter,getter,在数据变动时发布消息给订阅者,触发相应的监听回调。
Object.defineproperty(obj,prop,desc)
1 obj     需要定义属性的当前对象
2 prop    当前需要定义的属性名
3 desc    描述符 一般是一个对象

var book = {
    _year : 2004,
    edition : 1
}
Object.defineProperty(book,"year",{

    enumerable:true, //控制属性是否可以枚举,默认值是false
    writable:true, //控制属性是否可以被修改,默认值是false
    configurable:true //控制属性是否可以被删除,默认值是false

    get: function(){
        return this._year
    },
    set: function(newYear){
        if(newYear > 2004){
            this._year = newYear;
            this.edition += newYear - 2004
        }
    }

})
# Vue中的组件通讯方式
组件通信的方式如下:
- props / $emit
父组件通过props向子组件传递数据,子组件通过$emit和父组件通信
// 父组件
<template>
  <div class="section">
    <com-article :articles="articleList" @onEmitIndex="onEmitIndex"></com-article>
    <p>{{currentIndex}}</p>
  </div>
</template>

<script>
import comArticle from './test/article.vue'
export default {
  name: 'comArticle',
  components: { comArticle },
  data() {
    return {
      currentIndex: -1,
      articleList: ['红楼梦', '西游记', '三国演义']
    }
  },
  methods: {
    onEmitIndex(idx) {
      this.currentIndex = idx
    }
  }
}
</script>

//子组件
<template>
  <div>
    <div v-for="(item, index) in articles" :key="index" @click="emitIndex(index)">{{item}}</div>
  </div>
</template>

<script>
export default {
  props: ['articles'],
  methods: {
    emitIndex(index) {
      this.$emit('onEmitIndex', index) // 触发父组件的方法,并传递参数index
    }
  }
}
</script>
- eventBus事件总线(
$emit / $on)eventBus事件总线适用于父子组件、非父子组件等之间的通信,使用步骤如下: 1.创建事件中心管理组件之间的通信 2.在firstCom组件中发送事件 3. 接收事件 在secondCom组件中发送事件
// event-bus.js
import Vue from 'vue'
export const EventBus = new Vue()

//main.js
<template>
  <div>
    <first-com></first-com>
    <second-com></second-com>
  </div>
</template>

<script>
import firstCom from './firstCom.vue'
import secondCom from './secondCom.vue'
export default {
  components: { firstCom, secondCom }
}
</script>

//firstCom.js
<template>
  <div>
    <button @click="add">加法</button>
  </div>
</template>

<script>
import {EventBus} from './event-bus.js' // 引入事件中心

export default {
  data(){
    return{
      num:0
    }
  },
  methods:{
    add(){
      EventBus.$emit('addition', {
        num:this.num++
      })
    }
  }
}
</script>

//secondCom.js
<template>
  <div>求和: {{count}}</div>
</template>

<script>
import { EventBus } from './event-bus.js'
export default {
  data() {
    return {
      count: 0
    }
  },
  mounted() {
    EventBus.$on('addition', param => {
      this.count = this.count + param.num;
    })
  }
}
</script>
# ref / $refs